The title sounds cool, right? Well, that's the name given by Wyne for today's How-To.
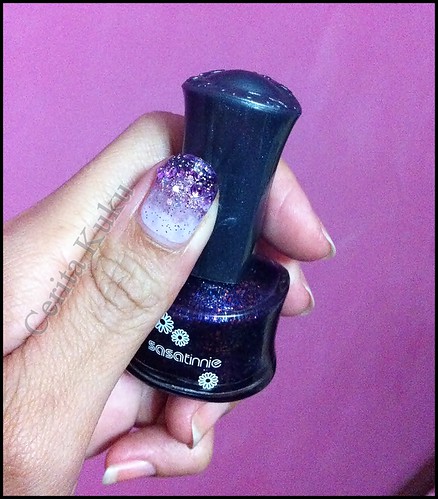
Actually, Wyne requested that I created a nail art design for her to wear during her Bollywood themed event next month. The theme color is purple with bling-bling. Now, that's Bollywood alright.
So today, am gonna share with you how I make this gradient purple bling nail design. The method used involves sponging to create gradient.
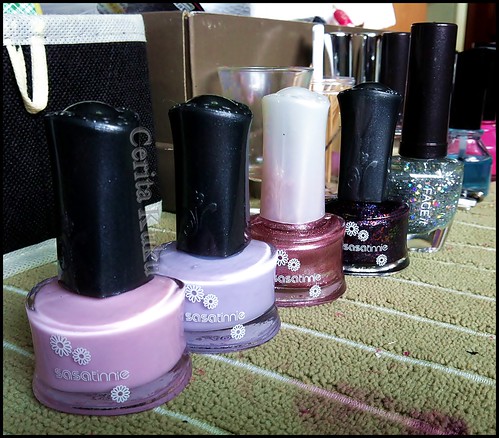
These are the colors I used.
---> Fantasy Color (for sasatinnie) in FCW029, FCW006, FCROS009, FCGL002 and Faceit by TheFaceShop SL211.
.
.
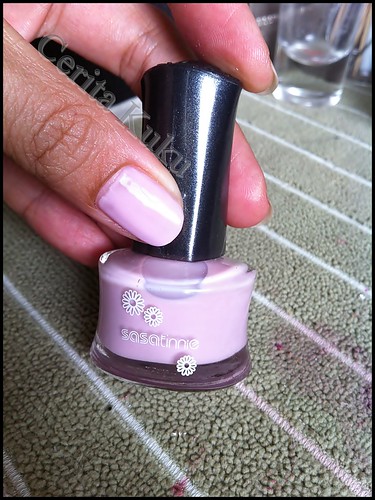
After putting base coat, apply the base color (FCW029). Let to dry completely.
.
.
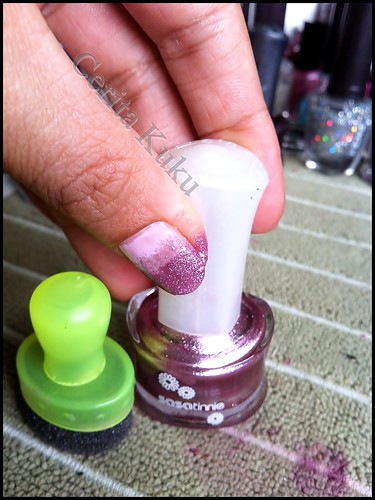
Using a nail sponge (you can use household sponge or make-up sponge too actually), drop some FCW006 on the sponge and dab on the nail, making a gradient. Dry completely.

.
.
Same method, dab the FCROS009 creating gradient as well.
.
.
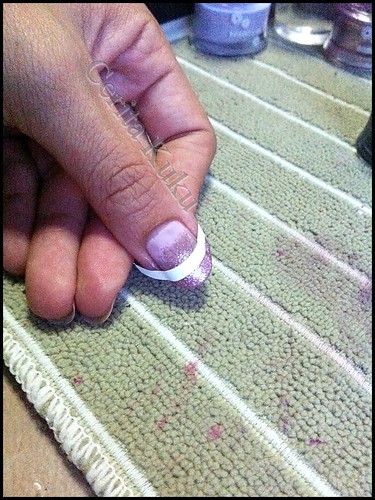
Using a self-adhesive French Manicure tip (mine is by Sally Hansen), paint the tip of the nail using the FCGL002. You can use Scotch tape or masking tape in the absence of the self-adhesive French Mani tip.
.
.
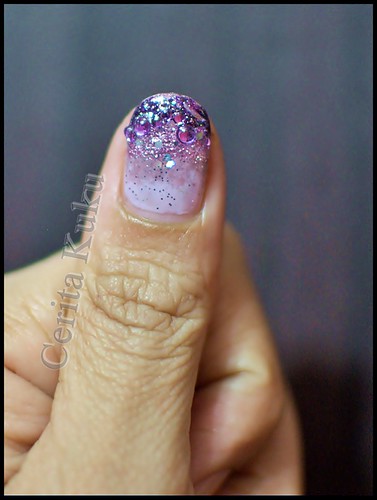
Add on some various size purple rhinestones when the final paint is slightly tacky. Do not wait till dry otherwise it's hard to stick on the rhinestone. You can arrange the rhinestone on straight lines or in my case, I created a slight curves to accentuate the gradient line.
.
.
Final step is to apply top coat to seal the rhinestones. In my case, I use glitter nail polish that has the combination of small and medium glitters. Just to add more bling to it.
.
.
Voila!
Important reminder again, make sure each color is COMPLETELY dry before applying the next one except the final color.
Happy trying girls and Wyne, hope you will have magnificent bling-bling fingers during that night!
*Nail Hug*
I'm studying this...studying this.
ReplyDeleteWowiieee, Mauve OceanBlue is super beautiful and magnificent! (^^)
You have the coolest nail art tools! Where did you get the nail sponge?? I want that. Maybe senang sikit mau dab on the nails kan? I still haven't found the time to look around. Doubt they sell those stuff here.
ReplyDeleteBtw, I like this design too.Keep it coming Kay! :)
Oh, I wanted to ask you ba. In your previous post about Pink October 2nd design, you mentioned that the tutorial for the 1st design can be found 'HERE'. Tapi teda link dia. :) Sibuk ja sia ni kan...hehehe...
ReplyDeleteMoren, bah pelan2 study...lama lagi tu ^__^
ReplyDeleteLiz, the nail sponge tu sia beli di Daiso. RM5 saja. I read in one nail website, it says that using make up sponge lagi bagus dia punya sponging effect. Im gonna try it next. Kalau bagus, sia beli saja bnyak2 tu make up sponge :)
Oh actually itu link from my personal blog bah tu tapi lupa pula buat link dia. If u remember i did the black n fuchsia with pink ribbon on my toe nails. itu yg first version :)
Ahh..I see. Yeah, I remember the pink ribbon design :) Sia ingat ada lagi ko buat ba tu :)
ReplyDeleteIf the make up sponge works well, senang juga mau dapat tu. I went hunting for the nail brush yesterday tapi nda jumpa. Last2 I bought painting brush for art work. That's the best I could find. Haven't tried painting the branches yet but I hope it works :)
Oh Liz, I feel like sending you the mini set line brush oh. It's really good to use for painting branches and of course, lines.
ReplyDeleteAww...that's so nice of you Kay. Tapi nda pa la ba, bikin susah ja. Lagipun, I'm not as rajin or as artistic as you. Nda lama mau balik KK suda juga. That time, sia minta kawan kau p shopping nail art tools ah :)
ReplyDeletesuper love....
ReplyDelete